Last Updated on 15/08/2025 by administrator
Installing Third-Party Packages on Cisco Nexus NX-OS
Installing Third-Party Packages on Cisco Nexus NX-OS: Best Practices
Motivation:
When working with Cisco Nexus switches running NX-OS, it is sometimes necessary to Installing Third-Party Packages on Cisco Nexus NX-OS to extend the switch’s functionality, such as monitoring agents or lightweight web servers. This guide explains how to do it safely, following best practices.
1. Use Cisco-Verified Repositories:
For installing third-party Linux packages (RPMs), Cisco provides an official repository for Open NX-OS packages:
Cisco DevHub Open-NXOS Repository:
https://devhub.cisco.com/artifactory/open-nxos/
Packages here are verified and tested for NX-OS. Always prefer Cisco’s repository over generic sources to reduce risk of compatibility issues.
Optional: Some guides reference EPEL (Extra Packages for Enterprise Linux), but not all packages are compatible with NX-OS (Wind River Linux). Only use packages explicitly verified for NX-OS.
- EPEL – Extra Packages for Enterprise Linux:
https://docs.fedoraproject.org/en-US/epel/available-packages/
As a example lighttpd packages will be downloaded.
2. Transfer RPM Packages to the Nexus Switch:
Example of copy a rpm files from a SSH server (running under IP address 192.168.1.10) to the NX-1 device:
NX-1# scp yourlogin@192.168.1.10:/path/on/server/*.rpm bootflash:Or it can be done from Linux server, where 10.1.1.100 is IP address of NX-1:
student@student-vm:~/labs/lighttpd$ scp *.rpm cisco@10.1.1.100:bootflash:/
Confirm that the packages were transferred on NX-1:
NX-1# dir bootflash:
       4096    Oct 15 09:08:27 2024  .rpmstore/
       4096    Oct 15 09:08:46 2024  .swtam/
          0    Oct 15 09:08:40 2024  bootflash_sync_list
       4096    Oct 15 09:08:48 2024  eem_snapshots/
       4096    Oct 15 09:08:45 2024  evt_log_snapshot/
     111200    Oct 15 12:52:41 2024  lighttpd-1.4.36-r0.0.lib32_x86.rpm
       7029    Oct 15 12:52:41 2024  lighttpd-module-access-1.4.36-r0.0.lib32_x86.rpm
      11925    Oct 15 12:52:41 2024  lighttpd-module-accesslog-1.4.36-r0.0.lib32_x86.rpm
      13586    Oct 15 12:52:41 2024  lighttpd-module-dirlisting-1.4.36-r0.0.lib32_x86.rpm
       7506    Oct 15 12:52:41 2024  lighttpd-module-indexfile-1.4.36-r0.0.lib32_x86.rpm
       9820    Oct 15 12:52:41 2024  lighttpd-module-staticfile-1.4.36-r0.0.lib32_x86.rpm
 1956867584    Aug 04 22:58:29 2021  nxos.9.3.8.bin
          0    Oct 15 12:49:58 2024  platform-sdk.cmd
       4096    Oct 15 09:09:21 2024  scripts/
       4096    Oct 15 09:09:05 2024  virtual-instance/

Usage for bootflash://sup-local
 1974898688 bytes used
 2278920192 bytes free
 4253818880 bytes total
NX-1#
3. Enable Bash Shell (if necessary):
Enter the configuration mode and enable access to the Linux Bash shell of the Cisco Nexus switch:
NX-1# configure terminal
NX-1(config)# feature bash-shell
Exit the configuration mode and install the lighttpd package from the bootflash:
NX-1(config)# exit
NX-1# install add bootflash:lighttpd-1.4.36-r0.0.lib32_x86.rpm
[####################] 100%
Install operation 1 completed successfully at Wed Oct 16 08:01:52 2024
NX-1#
Display the inactive packages. The inactive packages were installed on the switch but are not currently active or in use:
NX-1# show install inactive
Boot Image:
        NXOS Image: bootflash:///nxos.9.3.8.bin

Inactive Packages:
        lighttpd-1.4.36-r0.0.lib32_x86

Inactive Base Packages:
        innusd_n9000-1.0.0.0-9.3.8.lib32_n9000
        nxusd_n9000-1.0.0.0-9.3.8.lib32_n9000
NX-1#
4. Installing Third-Party Packages on Cisco Nexus NX-OS:
Installing Third-Party Packages on Cisco Nexus NX-OS for the all lighttpd packages modules:
NX-1# install add bootflash:lighttpd-module-access-1.4.36-r0.0.lib32_x86.rpm
[####################] 100%
Install operation 2 completed successfully at Wed Oct 16 10:29:51 2024

NX-1# install add bootflash:lighttpd-module-accesslog-1.4.36-r0.0.lib32_x86.rpm
[####################] 100%
Install operation 3 completed successfully at Wed Oct 16 10:30:04 2024

NX-1# install add bootflash:lighttpd-module-dirlisting-1.4.36-r0.0.lib32_x86.rpm
[####################] 100%
Install operation 4 completed successfully at Wed Oct 16 10:30:17 2024

NX-1# install add bootflash:lighttpd-module-indexfile-1.4.36-r0.0.lib32_x86.rpm
[####################] 100%install a
Install operation 5 completed successfully at Wed Oct 16 10:30:30 2024

NX-1# install add bootflash:lighttpd-module-staticfile-1.4.36-r0.0.lib32_x86.rpm
[####################] 100%
Install operation 6 completed successfully at Wed Oct 16 10:30:37 2024
Activate the lighttpd package:
NX-1# install activate lighttpd-1.4.36-r0.0.lib32_x86
[####################] 100%
Install operation 7 completed successfully at Wed Oct 16 10:33:01 2024
5. Verify Installation:
Connect to Bash Shell as root user. This command gives you complete root access to the system, putting you into the root user’s environment:
NX-1# run bash sudo su -
root@NX-1#
In the Bash Shell, list all packages and pipe the output into grep to filter for lines containing „lighttpd„. The output displays the installed lighttpd package along with its associated modules. The third column indicates that packages were installed from the third-party repository:
root@NX-1#yum list | grep lighttpd
lighttpd.lib32_x86                     1.4.36-r0.0                   @thirdparty
lighttpd-module-access.lib32_x86       1.4.36-r0.0                   @thirdparty
lighttpd-module-accesslog.lib32_x86    1.4.36-r0.0                   @thirdparty
lighttpd-module-dirlisting.lib32_x86   1.4.36-r0.0                   @thirdparty
lighttpd-module-indexfile.lib32_x86    1.4.36-r0.0                   @thirdparty
lighttpd-module-staticfile.lib32_x86   1.4.36-r0.0                   @thirdparty
6. Configure the Application:
In the terminal, open the lighttpd configuration file in a text editor:
root@NX-1#vi /etc/lighttpd.conf
and put new line down. This configures the lighttpd server to listen for incoming connections on all available network interfaces, making it accessible from external systems.
server.bind = "0.0.0.0"
Press the Esc key to exit the editing mode and enter the :wq command to save the changes:
:wq
Start a Bash shell, and ensure that all network operations within this shell run only inside the „management“ namespace using command below:
root@NX-1#ip netns exec management bash
Restart the lighttpd service, thereby applying the changed configuration and ignore the two warnings that you receive:
root@NX-1#service lighttpd restart
Restarting Lighttpd Web Server: stopped /usr/sbin/lighttpd (pid 23837)
/usr/sbin/lighttpd: /lib/libcrypto.so.1.0.0: no version information available (required by /usr/sbin/lighttpd)
/usr/sbin/lighttpd: /usr/lib/libssl.so.1.0.0: no version information available (required by /usr/sbin/lighttpd)
lighttpd.
root@NX-1#
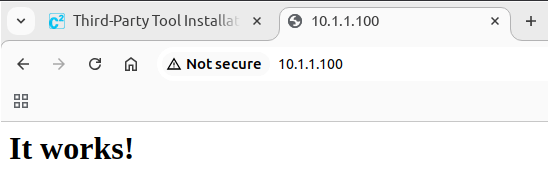
Open a new tab in your browser and navigate to 10.1.1.100. If you can see „It works!“ all was done properly and HTTP server is running:
I hope this article Installing Third-Party Packages on Cisco Nexus NX-OS helped.
