Last Updated on 16/02/2025 by administrator
Proxmox – Instalace PiAlert WIFI / LAN intruder detektoru
Proxmox – Instalace PiAlert WIFI / LAN intruder detektoru
Motivace:
Pi.Alert je WIFI / LAN intruder detektor, který dokáže provést oskenování sítě a nalézt všechna připojena zařízení.
Princip funkce:
Metoda 1 – ARP skenování
PiAlert posílá ARP requesty (do celé podsítě např. 192.168.0.0-192.168.0.255) a ta stanice, která mu pošle ARP reply je pro něj UP a z MAC adresy zjistí Vendora.
Metoda 2 – DNS skenování
Tato metoda doplňuje metodu 1. Pokud je v síti aktivní Pi-Hole, nebo jiný DNS server obsahující PTR záznamy, PiAlert posílá jako žádost PTR záznam a očekává odpověď ve formě doménového jména příslušné stanice z DND serveru.
Metoda 3 – DHCP skenování (dnsmasq)
Další metoda, která je doplněním přechozích metod. Pokud se Pi-Hole využívá pro DNS i DHCP server, tak se PiAlert doptává DHCP serveru na IP adresy, které byly vypůjčeny.
OS:
Implementace byla prakticky prováděna na open-source platformě Proxmox verze 7.4-3.
Implementace – Proxmox – Instalace PiAlert WIFI:
Instalace PiAlert:
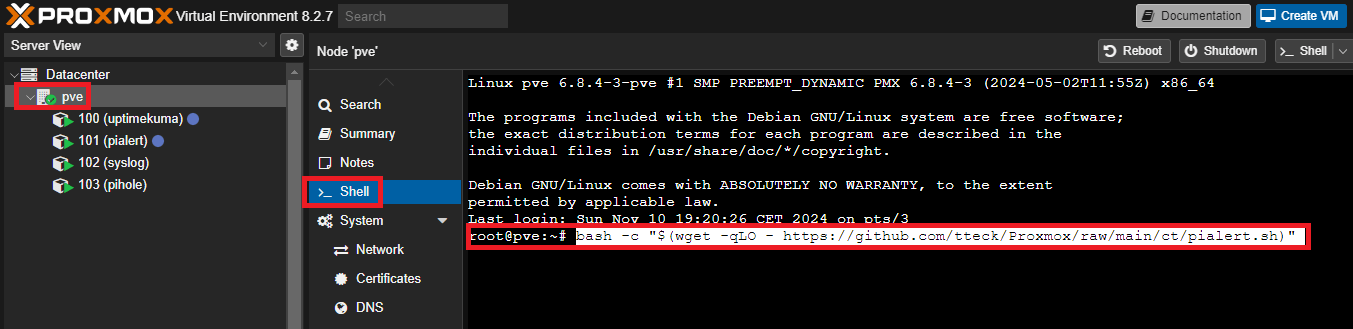
Pro vytvoření nového CT LXC v Proxmox VE, je nutné zadat příkaz níže přímo pod Proxmox VE serverem. Nevytvářet nový CT (script Vám to „nesežere“) Ten bude vytvořen právě tímto scriptem níže:
bash -c "$(wget -qLO - https://github.com/tteck/Proxmox/raw/main/ct/pialert.sh)"
Pozn. Je doporučeno script výše přímo přes shell v prohlížeči Proxmox mod, než použít SSH, mohou vzniknout potencionální komplikace viz. se ukáže hláška – It’s advisable to utilize the Proxmox shell rather than SSH, as there may be potential complications with variable retrieval.
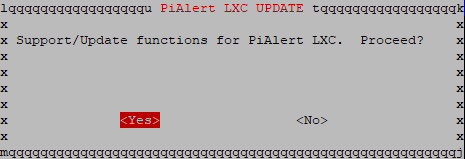
Zobrazí průvodce instalací, kliknout na Yes:

Pozn. Pokud vyskočí hláška níže (protože podpora pro script je pro Debian 12 a ne pro Debian 11) …

… je potřeba zvolit Advanced.

Jako distribuce byla použita Debian 11. CT kontejner je pojmenovaný jako pialert s ID číslem 110 a jedná se o neprivilegovaný kontejner (Container Type 1). Doporučuje se použít 512 MB RAM a 3 GB diskové kapacity s 1 CPU. Jako IP adresa byla použita 192.168.88.110/24 s defaultní branou 192.168.88.1, DNS serverem 192.168.88.103 a doménovým jménem lan.
Using Advanced Settings
Using Distribution: debian
Using debian Version: 11
Using Container Type: 1
Using Root Password: nejakeheslo
Container ID: 110
Using Hostname: pialert
Using Disk Size: 3
Allocated Cores: 1
Allocated RAM: 512
Using Bridge: vmbr0
Using IP Address: 192.168.88.110/24
Using Gateway IP Address: 192.168.88.1
Disable IPv6: no
Using Interface MTU Size: Default
Using DNS Search Domain: lan
Using DNS Server IP Address: 192.168.88.103
Using Vlan: Default
Enable Root SSH Access: yes
Enable Verbose Mode: no
Vybrat příslušný disk pro instalaci PiAlert:

Proces vytváření PiAlert LXC kontejneru:
Creating a PiAlert LXC using the above advanced settings
✓ Using local for Template Storage.
✓ Using local-zfs for Container Storage.
✓ Updated LXC Template List
✓ LXC Container 110 was successfully created.
✓ Started LXC Container
✓ Set up Container OS
✓ Network Connected: 192.168.88.110
✓ Internet Connected
✓ DNS Resolved github.com to 140.82.121.3
✓ Updated Container OS
✓ Installed Dependencies
✓ Installed PHP Dependencies
✓ Installed Python Dependencies
✓ Installed Pi.Alert
✓ Finished Pi.Alert Scan
✓ Cleaned
✓ Completed Successfully!
PiAlert should be reachable by going to the following URL.
http://192.168.88.110/pialert/

Aktualizace PiAlert:
Pro provedení aktualizace PiAlert je potřeba spustit script níže přímo pod LXC kontejnerem (ne na Proxmox VE jako při instalaci):
bash -c "$(wget -qLO - https://github.com/tteck/Proxmox/raw/main/ct/pialert.sh)"
Výstup příkazu bash -c „$(wget -qLO – https://github.com/tteck/Proxmox/raw/main/ct/pialert.sh)“ vypadá následovně při upgradu PiAlert:
############################################################################
# You are planning to update Pi.Alert. Please make sure that no scan takes #
# place during the update to avoid possible database errors afterwards!!!  #
#                                                                          #
# This can be done by pausing the Arp scan via the settings page. However, #
# scans that are already running will not be terminated. For more          #
# information, check the Help/FAQ section in Pi.Alert                      #
############################################################################


Press enter to continue

############################################################
 Pi.Alert Update
############################################################
Mon Jan  1 23:35:19 CET 2024
Logfile: pialert_update_2024-01-01_23-35.log

- Checking Python...
Python 3 is installed on your system
mac-vendor-lookup is already installed
fritzconnection is already installed
Installing routeros_api...
WARNING: Running pip as the 'root' user can result in broken permissions and conflicting behaviour with the system package manager. It is recommended to use a virtual environment instead: https://pip.pypa.io/warnings/venv
routeros_api is now installed
pyunifi is already installed
- Stopping Pi.Alert...
No timeout is set. Pi.Alert restarts itself with the next scan after 10min.
arp-scan: no process found

Pi.Alert  (2023-10-23)
---------------------------------------------------------
Current User: root


Test Reporting...
    Skip mail...
    Skip PUSHSAFER...
    Skip PUSHOVER...
    Skip Telegram...
    Skip NTFY...
    Save report to file...

DONE!!!


Configured Pi.Alert scans are disabled

- Reset permissions...
- Deleting previous Pi.Alert backups...
- Creating new Pi.Alert backup...
....................................................................................................
- Cleaning previous version...
- Checking packages...
- Installing missing packages: python3-cryptography
- Downloading update file...
/opt/pialert_latest.tar                 100%[=================>]  82.77M  2.76MB/s    in 31s
- Uncompressing tar file
....................................................................................
- Deleting downloaded tar file...
- Generate autocomplete file...
- Copy autocomplete file...
- Config backup...
- Updating config file...
- Updating DB permissions...
- Installing sqlite3...
- Set Permissions...
- Create Logfile Symlinks...
- Set sudoers...
- Patch DB...
################################################################################
# You are planning to update the Pi.Alert DB. Please make sure that no scan    #
# takes place during the update to avoid possible database errors afterwards!  #
#                                                                              #
# This can be done by pausing the Arp scan via the settings page. However,     #
# scans that are already running will not be terminated. For more information, #
# check the Help/FAQ section in Pi.Alert                                       #
#                                                                              #
# Press STRG+C to Abort                                                        #
################################################################################


Press enter to continue

Update DB /opt/pialert/back/../db/pialert.db

Purge old db backup
rm: cannot remove '/opt/pialert/back/../db/pialert.db.bak': No such file or directory
...Create backup before insert new table
...Insert new table 'Online_History' to DB
...Insert new table 'network_infrastructure' to DB
...Insert new column 'dev_Infrastructure' to table 'Devices' to DB
        Column 'dev_Infrastructure' already exists in the 'Devices' table.
...Insert new column 'dev_Infrastructure_port' to table 'Devices' to DB
        Column 'dev_Infrastructure_port' already exists in the 'Devices' table.
...Insert new column 'net_downstream_devices' to table 'network_infrastructure' to DB
        Column 'net_downstream_devices' already exists in the 'network_infrastructure' table.
...Insert new table 'network_dumb_dev' to DB
...Insert new table 'Services_Events' to DB
...Insert new table 'Services_CurrentScan' to DB
...Insert new table 'Services' to DB
...Insert new column 'mon_Notes' to table 'Services' to DB
        Column 'mon_Notes' already exists in the 'Services' table.
...Insert new table 'pialert_journal' to DB
...Insert new column 'dev_Model' to table 'Devices' to DB
        Column 'dev_Model' already exists in the 'Devices' table.
...Insert new column 'dev_Serialnumber' to table 'Devices' to DB
        Column 'dev_Serialnumber' already exists in the 'Devices' table.
...Insert new column 'dev_ConnectionType' to table 'Devices' to DB
        Column 'dev_ConnectionType' already exists in the 'Devices' table.
...Insert new table 'ICMP_Mon' to DB
...Insert new table 'ICMP_Mon_CurrentScan' to DB
...Insert new table 'ICMP_Mon_Events' to DB
...Insert new column 'mon_ssl_subject' to table 'Services' to DB
        Column 'mon_ssl_subject' already exists in the 'Services' table.
...Insert new column 'mon_ssl_issuer' to table 'Services' to DB
        Column 'mon_ssl_issuer' already exists in the 'Services' table.
...Insert new column 'mon_ssl_valid_from' to table 'Services' to DB
        Column 'mon_ssl_valid_from' already exists in the 'Services' table.
...Insert new column 'mon_ssl_valid_to' to table 'Services' to DB
        Column 'mon_ssl_valid_to' already exists in the 'Services' table.
...Insert new column 'mon_ssl_fc' to table 'Services' to DB
        Column 'mon_ssl_fc' already exists in the 'Services' table.
...Insert new column 'cur_ssl_subject' to table 'Services_CurrentScan' to DB
        Column 'cur_ssl_subject' already exists in the 'Services_CurrentScan' table.
...Insert new column 'cur_ssl_issuer' to table 'Services_CurrentScan' to DB
        Column 'cur_ssl_issuer' already exists in the 'Services_CurrentScan' table.
...Insert new column 'cur_ssl_valid_from' to table 'Services_CurrentScan' to DB
        Column 'cur_ssl_valid_from' already exists in the 'Services_CurrentScan' table.
...Insert new column 'cur_ssl_valid_to' to table 'Services_CurrentScan' to DB
        Column 'cur_ssl_valid_to' already exists in the 'Services_CurrentScan' table.
...Insert new column 'cur_ssl_fc' to table 'Services_CurrentScan' to DB
        Column 'cur_ssl_fc' already exists in the 'Services_CurrentScan' table.
...Insert new column 'moneve_ssl_fc' to table 'Services_Events' to DB
        Column 'moneve_ssl_fc' already exists in the 'Services_Events' table.
...Insert new column 'Data_Source' to table 'Online_History' to DB
        Column 'Data_Source' already exists in the 'Online_History' table.
...Insert new table 'Tools_Speedtest_History' to DB

Update finished!

- Starting Pi.Alert...

Pi.Alert  (2023-12-31)
---------------------------------------------------------
Current User: root


Test Reporting...
    Skip mail...
    Skip PUSHSAFER...
    Skip PUSHOVER...
    Skip Telegram...
    Skip NTFY...
    Save report to file...

DONE!!!


Configured Pi.Alert scans are enabled
- Testing Pi.Alert HW vendors database update process...
*** PLEASE WAIT A COUPLE OF MINUTES...

Pi.Alert  (2023-12-31)
---------------------------------------------------------
Current User: root

Update HW Vendors
    Timestamp: 2024-01-01 23:36:00

Updating vendors DB...

Searching devices vendor
    Devices Ignored:   0
    Vendors Not Found: 0
    Vendors updated:   0

Try build in mac-vendor-lookup update
    Update successful

- Testing Pi.Alert Internet IP Lookup...

Pi.Alert  (2023-12-31)
---------------------------------------------------------
Current User: root

Check Internet IP
    Timestamp: 2024-01-01 23:37:00

Retrieving Internet IP...
    213.192.14.249

Retrieving previous IP...
    213.192.14.249
    No changes to perform

Skipping Dynamic DNS update...

Skipping Speedtest... Not installed!

DONE!!!


- Testing Pi.Alert Network scan...
*** PLEASE WAIT A COUPLE OF MINUTES...

Pi.Alert  (2023-12-31)
---------------------------------------------------------
Current User: root

Scan Devices
    Timestamp: 2024-01-01 23:37:00

Scanning...
    arp-scan Method...
    arp-scan: One interface
    Pi-hole Method...
        ...Skipped
    DHCP Leases Method...
        ...Skipped
    Fritzbox Method...
        ...Skipped
    Mikrotik Method...
        ...Skipped
    UniFi Method...
        ...Skipped

Processing scan results...
    Processing ignore list...
        Delete 0 ignored devices from scan on appearance
    Devices Detected.......: 29
        arp-scan Method....: 27
        Pi-hole Method.....: +0
        Fritzbox Method....: +0
        Mikrotik Method....: +0
        UniFi Method.......: +0
        New Devices........: 0

    Devices in this scan...: 29
        Down Alerts........: 0
        New Down Alerts....: 0
        New Connections....: 0
        Disconnections.....: 0
        IP Changes.........: 0

Updating DB Info...
    Sessions Events (connect / discconnect) ...
    Creating new devices...
    Updating Devices Info...
        Trying to resolve devices without name..........................
        Names updated:   0
    Voiding false (ghost) disconnections...
    Pairing session events (connection / disconnection) ...
    Creating sessions snapshot...
    Skipping repeated notifications...
    Calculate Activity History...

Start ICMP Monitoring...
    Get Host/Domain List...
        List contains 0 entries
    Flush previous ping results...
    Ping Hosts...
    No Hosts(s) to monitor!

Reporting...
    Formating report...
    No changes to report...
    Notifications: 0

Reporting (ICMP Monitoring) ...
    No changes to report...

DONE!!!

------------------------------------------------------------
 Update process finished
------------------------------------------------------------

 ✓ Updated PiAlert
Hotovo!
Věřím, že tento článek Proxmox – Instalace PiAlert WIFI / LAN intruder detektoru pomohl.
Zdroj:
[1] https://tteck.github.io/Proxmox/